Table of Contents
Introduction
There’s something magical about building your first PC. You know that moment when you press the power button and everything lights up? Pure satisfaction. Whether you’re chasing the perfect gaming setup, need a powerhouse for work, or just love the idea of creating something with your hands, building a custom PC is one of the most rewarding tech projects you can tackle. Plus, you’ll save money and get exactly what you want.
Here’s the thing—understanding your components is everything. You don’t need a computer science degree, but knowing how a CPU talks to your motherboard, or why your RAM speed matters, makes all the difference. It’s like cooking: once you understand how ingredients work together, you can create something amazing. If you’re curious about the deeper tech side of things, exploring how modern computing technology shapes our hardware choices gives you that extra edge. Trust me, this knowledge pays off when you’re troubleshooting or planning upgrades down the road.
Let’s talk budget and purpose first. Are you building a gaming beast that’ll run the latest titles at max settings? A workstation for video editing or 3D rendering? Maybe just a solid everyday machine that won’t break the bank? Each path needs different hardware, and getting this right from the start saves you headaches (and money) later. The cool thing about understanding component roles is that you start seeing opportunities everywhere—like when upgrading PC RAM or graphics drivers becomes a simple weekend project instead of a mystery. Your future self will thank you.
Now for the fun part: putting it all together. Yes, it requires patience. You’ll carefully seat your CPU (don’t worry, it’s not as scary as it looks), connect cables, and manage everything so it looks clean and runs cool. First-time builders often feel overwhelmed, but here’s a secret—take it step by step, and you’ll be amazed at what you can accomplish. Learning smart approaches to installation, like how to upgrade computer RAM efficiently, sets you up for a lifetime of confident hardware work. Once you’ve built your first PC, you’ll never look at computers the same way again.
What You’ll Learn in This Guide
We’re going to walk through this entire process together, covering everything you need to know to build your PC with confidence. Here’s what’s coming up:
- Planning Your Build: Nail down your budget and figure out what you actually need. We’ll show you how to pick components that work together perfectly and match your performance goals without overspending.
- Choosing Components: Get to know every part that goes into your PC—processor, motherboard, RAM, storage, graphics card, power supply, and case. You’ll understand what each piece does and how to choose the right one for your build.
- Step-by-Step Assembly: The actual building process, from prepping your case to connecting everything up. We’ll cover cable management tricks, safety tips, and how to avoid common rookie mistakes.
- Post-Build Setup and Maintenance: Get your new PC up and running with BIOS configuration, OS installation, and driver setup. Plus, we’ll cover keeping your system healthy and planning future upgrades.
By the end of this guide, you’ll have a fully functional PC and the confidence to maintain and upgrade it yourself. Want to boost performance later? Resources on upgrading PC RAM and graphics drivers will be your go-to references for keeping your system current and optimized.
The broader tech landscape is evolving fast too. Smart homes, IoT devices, and AR applications are changing how we think about computing power and connectivity. When you understand how to build and customize PCs, you’re positioning yourself to take advantage of these trends. Your hands-on experience gives you insights that purely theoretical knowledge can’t match.
Ready to dive in? This guide works whether you’re starting from zero or just want to sharpen your skills. Building a PC might seem intimidating at first, but it’s really just adult LEGO with better performance specs. Let’s turn you into someone who not only owns a great computer but actually built it themselves. Time to get started!
There’s something magical about building your first PC. Sure, you could grab a pre-built system off the shelf—but where’s the fun in that? When you build your own computer, you’re not just assembling parts. You’re creating something that’s uniquely yours, tailored to exactly what you need. Want a beast for gaming? You got it. Need a workhorse for video editing? No problem. Plus, here’s the bonus: once you’ve built a PC, you’ll actually understand what’s going on inside that mysterious box. No more wondering why your computer is acting up or feeling helpless when something goes wrong. But let’s be real—this isn’t a weekend project you can wing. You need a plan, some patience, and a good understanding of how all these components play together. Ready to dive in?
Planning Your PC Build: Choosing Components and Ensuring Compatibility
Here’s where most people either nail it or completely mess things up: the planning phase. Before you start throwing money at shiny components (trust me, it’s tempting), you need to get crystal clear on two things. First, what’s your budget? And second, what are you actually going to do with this computer? These aren’t just casual questions—they’re going to drive every single decision you make.
Gaming rig? Content creation powerhouse? Basic productivity machine? Each path leads to completely different hardware choices. Start with your processor—that’s the brain of your operation. Once you’ve picked your CPU, you need a motherboard that speaks the same language (literally, they need matching socket types). Then comes the fun stuff: RAM, storage, and maybe a graphics card that’ll make your friends jealous. Don’t forget the power supply—because nothing kills the mood like components that can’t get enough juice. And yes, you need a case that actually fits everything. Sounds obvious, but you’d be surprised how many people learn this the hard way. If you want to dig deeper into compatibility and understand how components work together, check out this guide on how to upgrade PC RAM effectively.
Now, compatibility isn’t just about matching socket types—though that’s definitely step one. Think of it like building a team where everyone needs to work well together. Your motherboard needs to support your RAM’s speed and capacity. Your power supply needs the right connectors for your graphics card. Your case needs enough room for your cooling setup. Miss any of these connections, and you’re looking at returns, delays, and a lot of frustration. The good news? There are online PC builders and forums where people love helping newcomers avoid these pitfalls. Use them—seriously.
Key Aspects of Planning Your PC Build
Let’s break down the essential elements that’ll make or break your build before you even touch a screwdriver.
- Defining Your Budget and Performance Goals: Figure out what you can actually spend and what you need this computer to do—gaming, video editing, or just browsing the web—so you don’t end up with overkill components or a system that can’t handle your workload.
- Selecting a Compatible Motherboard and Processor: Pick a CPU and motherboard that work together (matching socket types is non-negotiable) and make sure the chipset gives you the features you actually want.
- Choosing the Right Memory and Storage Options: Decide how much RAM you need and whether you want the speed of an SSD or the storage space of a traditional hard drive—or maybe both if your budget allows.
- Ensuring Adequate Power Supply and Cooling: Get a power supply that can handle all your components with room to spare, and plan your cooling strategy whether you’re sticking with stock coolers or going all-out with custom solutions.
Once you’ve got your components planned and compatibility double-checked, you’re ready for the really exciting part. Time to put this puzzle together and watch it come to life.
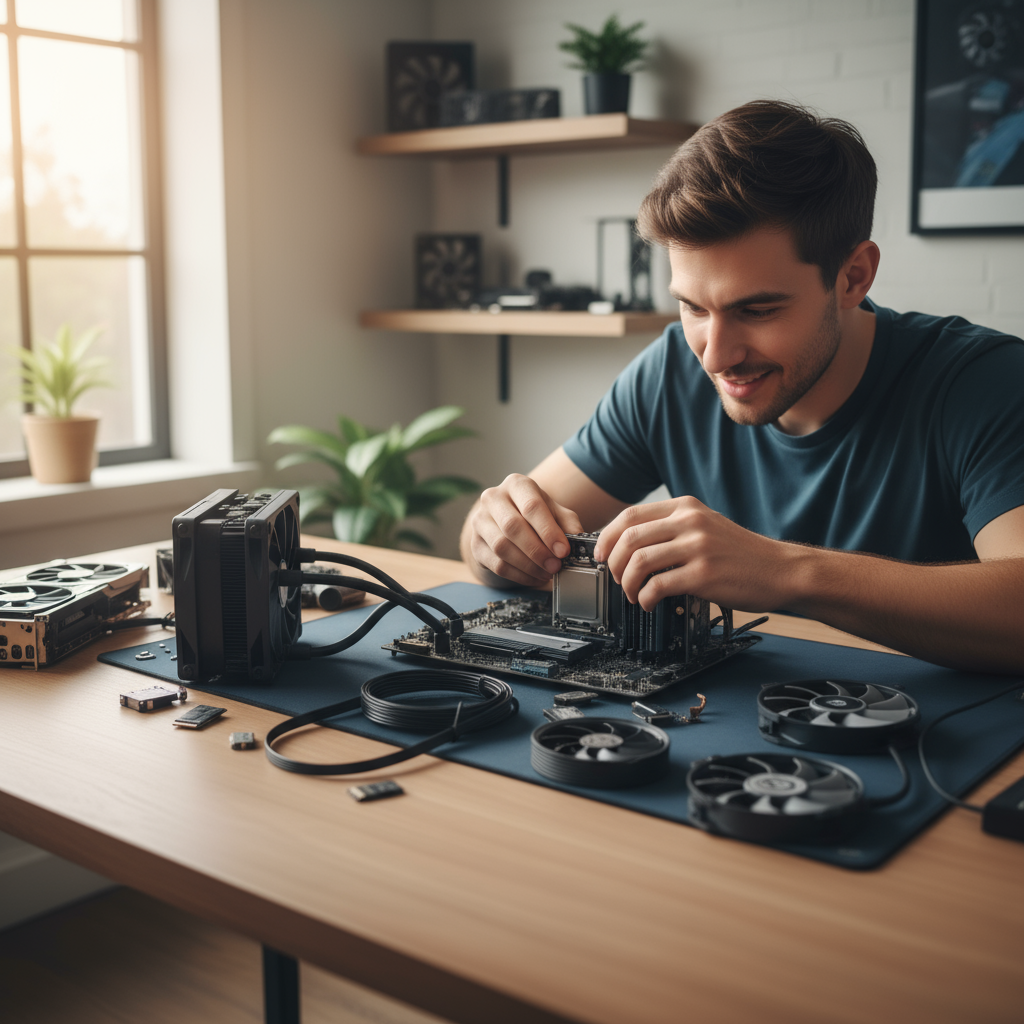
Step-by-Step Assembly Guide: Assembling Your PC and Connecting Peripherals
This is it—the moment where all that planning pays off. First things first: prep your workspace and crack open that case. You’ll want to install those motherboard standoffs (little brass spacers that keep your board from touching the case), and honestly, take a minute to just look at everything. Get familiar with where things go before you start handling delicate components.
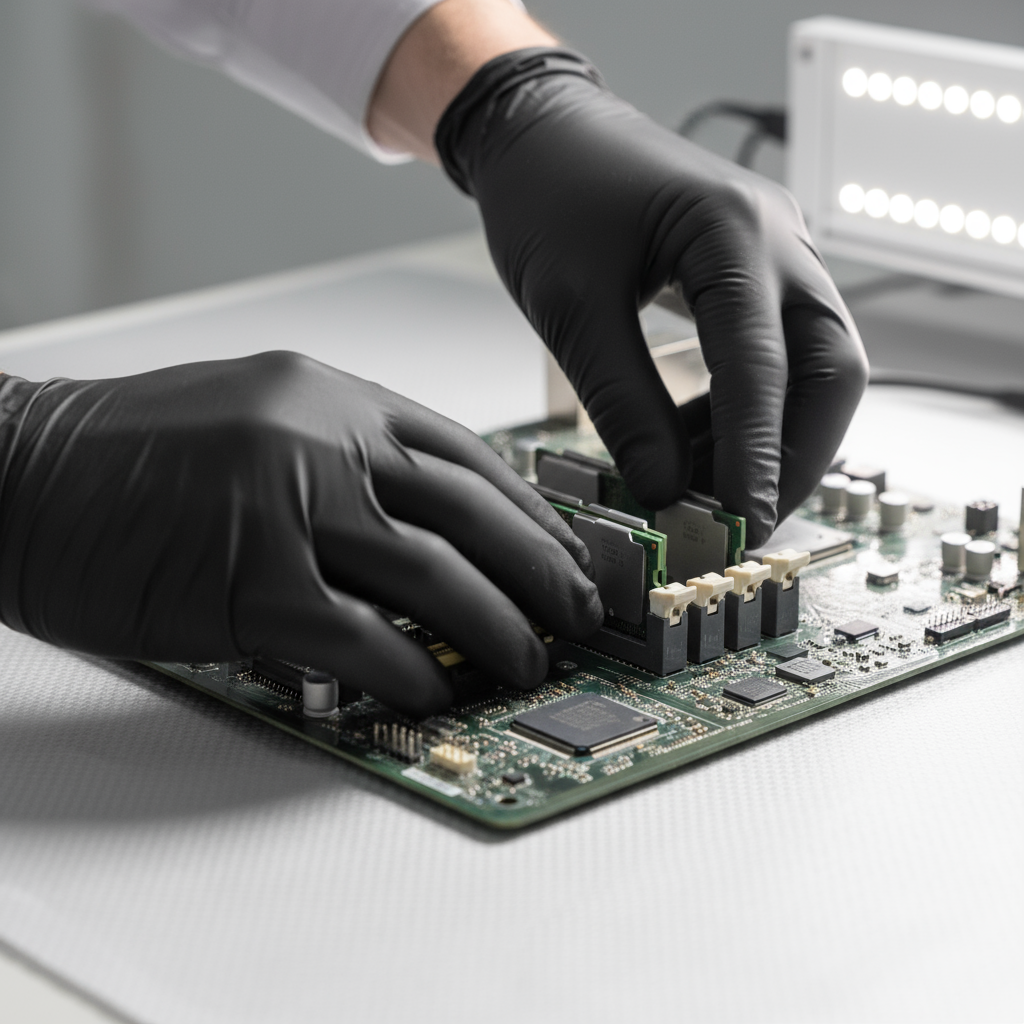
Start with the motherboard—mount it carefully onto those standoffs, making sure everything lines up with the case’s back panel. Then comes the CPU installation, and this is where you need to be gentle. Lift that socket lever, place your processor (there’s only one way it’ll fit, so don’t force it), and secure it down. No wrestling required—if it’s not going in easily, you’re probably doing something wrong. Next up: the CPU cooler, because nobody wants their processor turning into a tiny space heater. For more detailed assembly tips and techniques, take a look at this step-by-step guide on how to upgrade computer RAM.
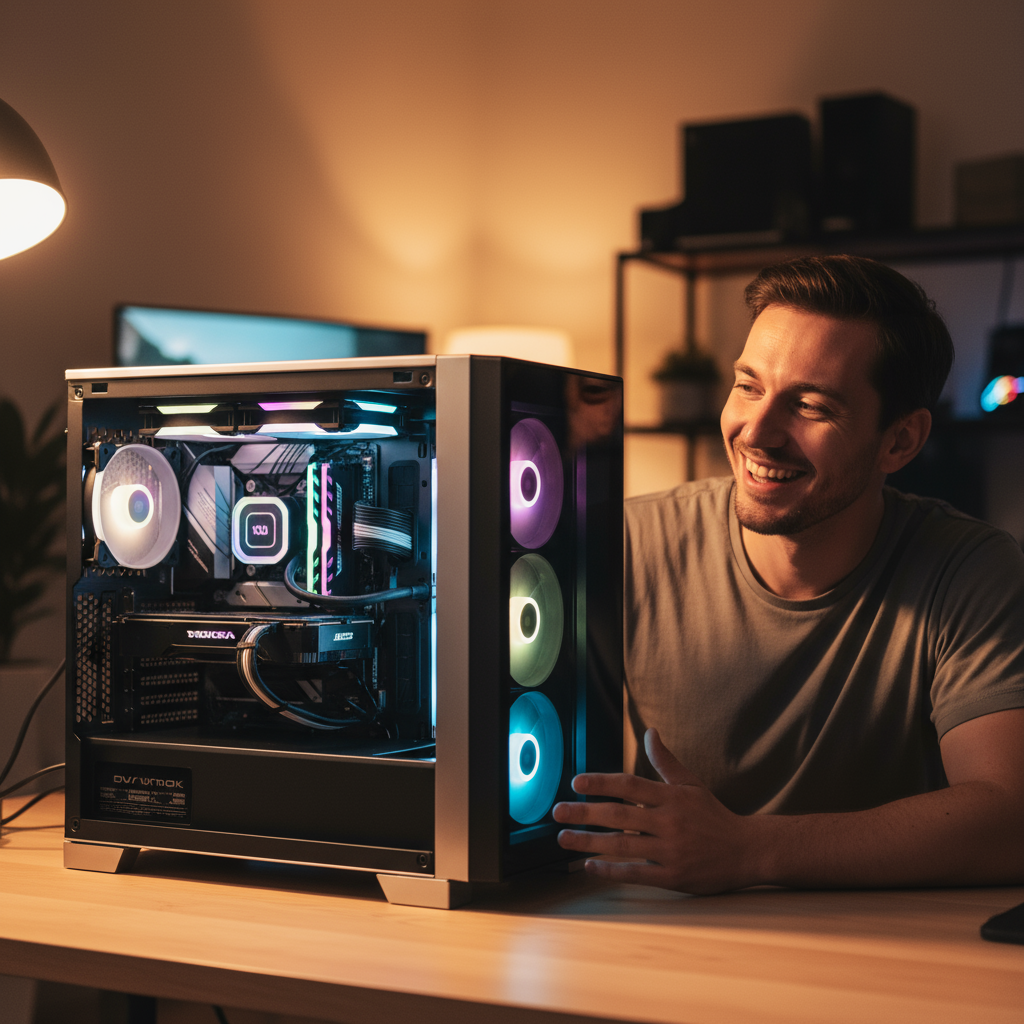
With your CPU sorted, it’s time for the supporting cast. RAM goes into the designated slots (you’ll hear a satisfying click when it’s seated properly). Storage drives get mounted—SSDs are fantastic for speed if you can swing it. Then slide in that graphics card, install your power supply, and here’s where things get interesting: cable management. Yeah, it might seem like busywork, but neat cables mean better airflow and easier upgrades down the road. Connect everything—motherboard power, GPU power, drive cables—and double-check every connection. Once your peripherals are hooked up, take a deep breath and hit that power button for the first time. Magic moment right there.
Key Aspects of PC Assembly and Setup
The assembly process has its own rhythm and flow. Here’s what you need to focus on to get it right.
- Preparing the Case Properly: Take off those side panels, get your standoffs installed correctly, and spend a few minutes understanding your case layout—it’ll save you headaches later.
- Installing Components with Care: Handle everything like it’s made of glass (because some of it basically is), use anti-static precautions, and make sure everything’s seated firmly without forcing anything.
- Cable Management Techniques: Route your cables thoughtfully, use zip ties to keep things tidy, and remember that good airflow today means better performance tomorrow.
- Connecting and Testing Peripherals: Hook up your keyboard, mouse, and monitor, then fire everything up and make sure it all works—there’s nothing quite like seeing that first successful boot.
There’s something magical about building your own PC. It’s part creativity, part puzzle-solving, and all rewarding. When you dive into understanding components—CPU, motherboard, RAM, storage, graphics card, power supply, and case—you’re not just learning specs. You’re figuring out how to make everything work together perfectly for what you actually need. Gaming beast? Content creation powerhouse? Simple productivity machine? Your budget and goals drive every decision, and that’s exactly how it should be.
Here’s the thing about assembly: it’s way less scary than it looks. Sure, you need patience (trust me, rushing never ends well). But when you take your time—prepping the case properly, seating components just right, keeping those cables tidy—everything clicks into place. And don’t forget the final stretch: BIOS setup, getting your OS installed, updating drivers, running those first tests. That’s where your build really comes alive. The best part? You’ll know exactly how to maintain and upgrade it down the road.
Nothing beats that moment when you hit the power button for the first time and everything lights up perfectly. You built this. With your own hands. Not only did you probably save some serious cash compared to buying pre-built, but you’ve gained something way more valuable—real technical confidence. Whether this is your first build or you’re sharpening skills you already have, you’ve just unlocked a whole new level of tech understanding.
Ready to take things further? Now that you’ve got the building fundamentals down, let’s talk optimization. Check out our guide on how to upgrade PC RAM—because more memory means better multitasking, and who doesn’t want that? You’ll also want to stay on top of how to upgrade graphics drivers to keep your visuals running smooth. And if you’re curious about what’s coming next in tech, our breakdown of latest technology trends in 2025 will keep you ahead of the curve.
Building a PC isn’t just about putting parts together—it’s about developing real technical confidence that carries over into everything else you do with technology. So embrace this challenge. Keep exploring. Be proud of what you’ve created. Your custom computer journey is just getting started, and honestly? The possibilities from here are pretty exciting. Every future upgrade is just another chance to learn something new and make your setup even better.
Frequently Asked Questions
-
Do I need prior experience to build a PC?
- No, anyone can build a PC with careful research and following step-by-step guides. Patience and attention to detail are key, and many online communities provide helpful support.
-
How much does it cost to build a personal computer?
- The cost varies widely depending on the components you choose and your intended use. Budget builds can be affordable, while high-performance gaming or workstation PCs may require significant investment.
-
Can I use parts from my old computer?
- Yes, some parts like storage drives or power supplies can be reused if they are compatible with your new build. Always check compatibility carefully to avoid issues.