
Table of Contents
Introduction
Your laptop keyboard sees a lot of action. And I mean a lot. Between coffee spills, snack crumbs, and whatever mysterious gunk seems to magically appear between the keys, it’s honestly surprising our keyboards work as well as they do. But here’s the thing—keeping that keyboard clean isn’t just about making it look nice (though that’s a bonus). It’s about keeping your laptop running smoothly and, let’s be real, not getting sick from whatever’s growing under the spacebar.
Think about it: your keyboard gets touched hundreds, maybe thousands of times per day. Food particles, oils from your skin, dust, even bacteria—it all finds its way into those little spaces. Gross, right? What’s worse is that all this buildup can actually mess with your laptop’s performance. Keys start sticking, some stop working altogether, and before you know it, you’re looking at an expensive repair bill. The good news? Cleaning your keyboard properly isn’t rocket science. If you want the full breakdown of techniques that actually work, check out this guide on how to clean laptop keyboards safely and effectively—it covers everything you need to know.
Keyboard cleaning is just one piece of the laptop care puzzle. Just like you might upgrade your RAM to boost performance, regular cleaning keeps everything running smoothly. And while we’re talking about keeping things clean, don’t forget about your other devices. Those tablet screens get just as grimy—here’s how to clean them properly. Oh, and cleaning your charging ports? Also important. It all works together.
There’s also the health factor we can’t ignore. Shared laptops at work or school? They’re basically germ highways. Even your personal laptop can harbor more bacteria than you’d expect. Regular cleaning isn’t just good tech maintenance—it’s basic hygiene. Nobody wants to catch something from their own keyboard.
What You’ll Learn in This Guide
We’re going to walk through everything you need to know about cleaning your laptop keyboard safely and effectively. No guesswork, no “hope for the best” approaches—just practical steps that work:
- Preparation Before Cleaning: Learn essential steps to gather the right supplies, power down your laptop, and remove loose debris to ensure a safe and successful cleaning experience.
- Step-by-Step Cleaning Process: Follow detailed instructions on surface cleaning, reaching into tight spaces between keys, and tackling stubborn stains carefully without causing any damage.
- Maintenance Tips for Longevity: Discover how to build a regular cleaning schedule, avoid common damage pitfalls, and the advantages of using protective keyboard covers to keep your device in top condition over time.
- When to Seek Professional Help: Identify signs your keyboard might require expert cleaning or repair and understand the benefits of consulting professionals for thorough maintenance beyond simple at-home care.
Whether you’re a complete beginner or someone who’s been putting off that keyboard cleaning for way too long (we’ve all been there), this guide has you covered. We’ll tackle the most common problems people run into—like that one key that always sticks, or figuring out how to clean without destroying anything important.
We’ll also cover the stuff that trips people up most often. Things like preparing your laptop properly, dealing with stubborn grime, and knowing when you’re in over your head and need professional help. Plus, we’ll share some preventative tricks that’ll save you time and headaches down the road. For more tech tips and insights, you might also find it interesting to read about technology integration in classrooms and how proper device care fits into modern tech use.
Look, a clean keyboard makes everything better. Your laptop responds faster, typing feels smoother, and you won’t have to worry about what’s lurking under your fingertips. Whether you’re dealing with everyday dust or facing a full-scale cleanup mission, you’ll have the confidence to handle it right. Ready to get those keys sparkling? Let’s dive in.
Ever notice how your laptop keyboard starts looking like a crime scene after a few weeks of use? Those mysterious crumbs wedged between your keys, the greasy fingerprint smudges, and let’s not even talk about what happens when you eat lunch while typing. Here’s the thing—keeping your keyboard clean isn’t just about aesthetics (though your coworkers will thank you). It’s actually about keeping your laptop running smoothly and lasting longer.
Think about it: every day, dust settles into those tiny gaps, oils from your fingers build up on the keys, and random debris finds its way into places it shouldn’t be. Over time, this gunk can make keys stick, become unresponsive, or even cause internal damage that’ll have you reaching for your wallet. And if you’re sharing your laptop or using it in a busy office? You’re basically hosting a germ convention on your keyboard.
So let’s walk through the right way to clean your laptop keyboard—safely and effectively. No guesswork, no “I hope this doesn’t break anything” moments. Just practical steps that’ll keep your keyboard looking fresh and working like new.
Preparation Before Cleaning Your Laptop Keyboard
Before you dive in, let’s talk prep work. I know, I know—you just want to start cleaning. But trust me, a few minutes of preparation now will save you from headaches (and potentially expensive repairs) later. Laptop keyboards are more delicate than they look, and rushing into cleaning without the right setup is like trying to perform surgery with oven mitts.
First things first: gather your cleaning arsenal. You’ll need microfiber cloths (the unsung heroes of electronics cleaning), gentle cleaning solutions that won’t fry your laptop’s circuits, compressed air for those hard-to-reach spots, and cotton swabs for precision work. These aren’t just suggestions—they’re your insurance policy against scratched surfaces and stubborn residue.
Find yourself a well-lit spot where you can work comfortably. Trust me, trying to clean a keyboard in dim lighting is like trying to thread a needle while squinting. You want to see every speck of dirt and reach every key without contorting yourself into a pretzel.
Now for the crucial part: power down your laptop completely and unplug everything. This isn’t just about being cautious—it’s about avoiding the nightmare scenario where you accidentally trigger a system command or, worse, get a shock. Plus, you’ll have the freedom to clean without worrying about pressing random keys and accidentally sending a half-finished email to your boss.
Here’s a neat trick that most people skip: flip your laptop upside down and give it a gentle shake. You’d be amazed at what falls out. Crumbs, dust bunnies, maybe that missing earring from last month. Follow this up with some compressed air to blow out the stubborn bits hiding in cracks. This step clears the deck for deeper cleaning and prevents you from just pushing dirt around during the wiping phase. Want to master this prep phase? Check out this detailed guide on how to clean laptop keyboards safely and effectively.
Key Aspects of Preparation Before Cleaning
Getting your prep game right makes everything else smoother. Here’s what really matters:
- Gathering the Right Supplies: Microfiber cloths are your best friend—they won’t scratch delicate surfaces like paper towels might. Electronics-safe cleaning solutions cut through grime without leaving behind residue or damaging your laptop’s finish. Compressed air is like a tiny tornado that clears out debris without you having to touch anything, while cotton swabs let you get surgical with those tight spots.
- Ensuring Laptop is Powered Off: This is non-negotiable. Shutting down completely and unplugging protects you from electrical nasties and prevents those “oops, I just deleted everything” moments when moisture hits the wrong key.
- Removing Loose Debris: Think of this as clearing the stage before the main performance. A quick shake and some compressed air action gets rid of the big stuff, so you’re not just smearing dirt around when you start the actual cleaning.
- Setting Up a Comfortable Workspace: Good lighting helps you spot every speck of dirt, proper ventilation keeps cleaning fumes from building up, and a clean, organized space means you won’t accidentally drop tiny components or spread dust around.
With everything set up properly, you’re ready to tackle the actual cleaning with confidence. No more crossing your fingers and hoping for the best—you’ve got this covered.
Step-by-Step Cleaning Process for Laptop Keyboards
Alright, now we’re getting to the good stuff. Cleaning your keyboard properly is like peeling an onion—you work in layers, from surface grime down to the stubborn stuff hiding in the cracks. Start with the easy wins: grab that slightly damp microfiber cloth and gently wipe down each key and the surrounding deck. The key word here is “slightly”—we’re talking barely moist, not dripping wet. Too much moisture and you’ll be dealing with water damage instead of just dirty keys.
This first pass takes care of fingerprints, oils, and surface dust. It’s satisfying how much cleaner everything looks after just this step. But don’t stop here—we’re just getting started.
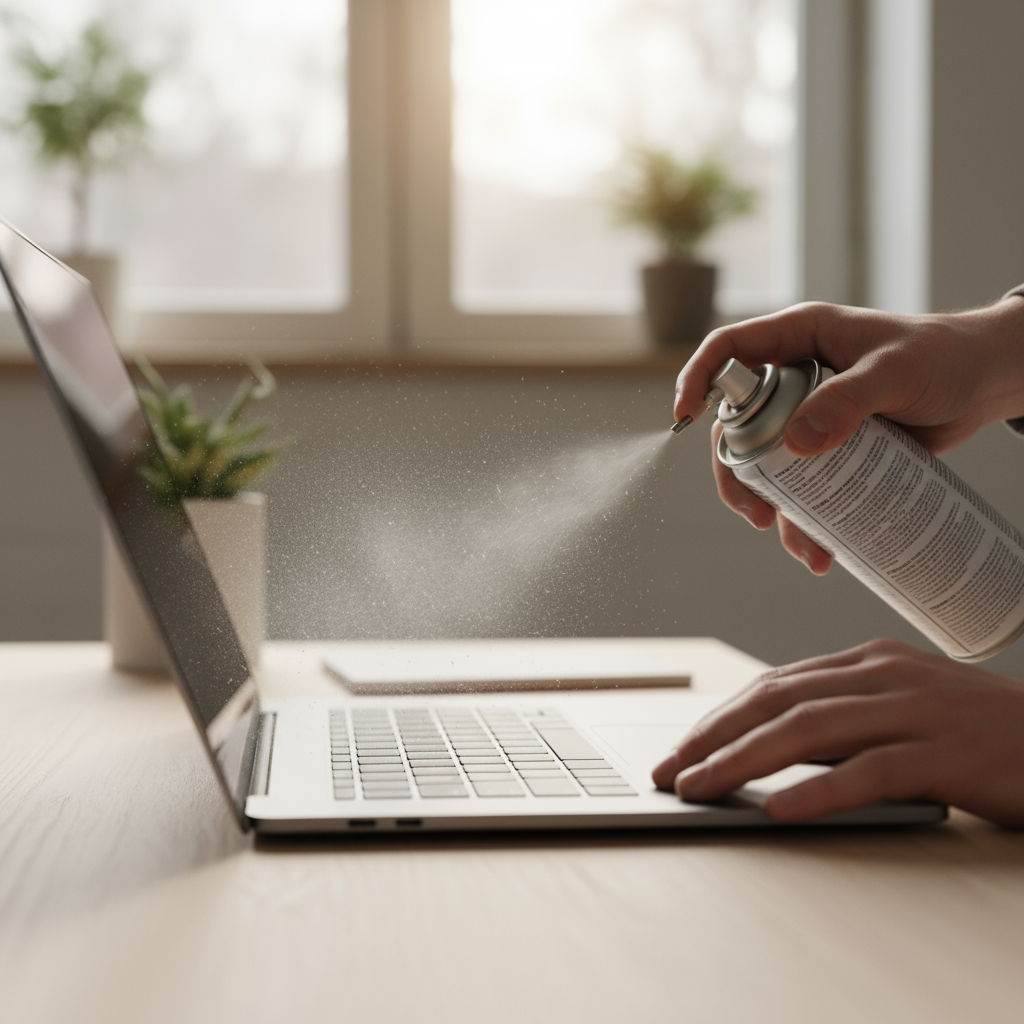
Now for the detective work: cleaning between the keys where the real nasties like to hide. This is where compressed air becomes your secret weapon. Hold the can at an angle and give those gaps short bursts of air. You’ll be shocked at what comes flying out. For the really stubborn gunk that compressed air can’t budge, break out the cotton swabs with a tiny bit of isopropyl alcohol or electronics-safe cleaner. Think of it as spot treatment for your keyboard’s trouble areas.
The trick is being patient and methodical. Don’t rush this part—those hard-to-reach spots are usually where problems start. And remember, when it comes to liquids and electronics, less is always more. You can find more detailed techniques in guides about how to clean laptop keyboards safely and effectively.
Key Aspects of the Cleaning Process
Here’s where the magic happens. Focus on these crucial steps:
- Surface Cleaning: Your damp microfiber cloth is perfect for lifting oils and giving your keyboard that fresh, clean look. Use light, circular motions and don’t forget the edges and spaces around each key. Gentle pressure is your friend here—you’re not scrubbing a kitchen counter.
- Cleaning Between Keys: Compressed air is like having a mini leaf blower for your keyboard. Follow up with cotton swabs for precision cleaning when you encounter those sticky spots that just won’t budge. It’s methodical work, but oddly satisfying.
- Dealing with Stubborn Stains: Some spots need extra attention. A cotton swab with a drop of isopropyl alcohol works wonders, but steer clear of harsh chemicals that might strip key labels or damage protective coatings. When in doubt, gentler is better.
- Drying and Final Inspection: Before you power up, make sure everything’s bone dry. Take a moment to admire your work and test a few keys to make sure everything feels right. There’s nothing worse than discovering a problem after you’ve already closed everything up.
Regular cleaning like this doesn’t just make your laptop look professional—it actually prevents the kind of hardware issues that come from dirt buildup and moisture damage. With a clean, well-maintained keyboard, you’ll notice smoother typing and better responsiveness. Plus, your laptop will last longer, which means more money in your pocket and less frustration in your life.

Here’s the thing about keeping your laptop keyboard clean—it’s not just about making it look good (though that’s a nice bonus). A clean keyboard actually keeps you healthier and your laptop running smoothly. We’ve covered a lot of ground here, from why dust and grime are your keyboard’s worst enemies to the prep work that makes all the difference. You know, powering down properly, getting your supplies together, clearing out those loose crumbs. The actual cleaning? That’s where the magic happens—gentle wiping, tackling the stubborn stuff between keys, making sure everything works like it should.
But here’s what really matters: staying on top of it. Set up a cleaning routine that works for you. Maybe grab a keyboard cover while you’re at it. Trust me, a little prevention beats expensive repairs every time. And if keys start acting up despite your best efforts? Don’t be a hero—sometimes you need professional help, and that’s perfectly okay.
Ready to take your laptop care to the next level? Consider learning how to upgrade your laptop memory—because a clean keyboard paired with better performance is a beautiful thing. Got other devices that need some TLC? Check out these tips on how to clean tablet screens for a complete device hygiene routine. And since we’re talking about staying current, keeping up with the latest technology trends for 2025 will help you make smarter decisions about your tech setup.
Look, you’ve got everything you need now to keep that keyboard spotless and performing like a champ. It’s really not complicated—just consistent care that pays off in better typing, fewer sick days, and a laptop that lasts longer. Make it a habit, stay curious about tech improvements, and enjoy the satisfaction of a workspace that actually works for you.
Frequently Asked Questions
-
Can I use water directly on the keyboard?
- Direct water use is not recommended; use damp cloths instead to avoid damage.
-
How often should I clean my laptop keyboard?
- Cleaning frequency depends on usage, but a weekly light cleaning is generally advised.
-
What if some keys stop working after cleaning?
- Consider professional help as there might be underlying hardware issues.
-
Is it safe to use disinfectant wipes on the keyboard?
- Use disinfectant wipes sparingly and ensure they are safe for electronics.
-
Can compressed air damage my keyboard?
- When used properly, compressed air is safe and effective for removing debris.